
How to create an API tester component in React
In this tutorial, I will share how we can create a component which can test an API and show the JSON response in a container with the JSON nicely formatted.
On most documentation pages on companies etc that are providing some sort of API, there are usually a try the API functionality which show the endpoint and the response. We have it as well on our open source page for our APIs - so I thought I could share how it can be solved.
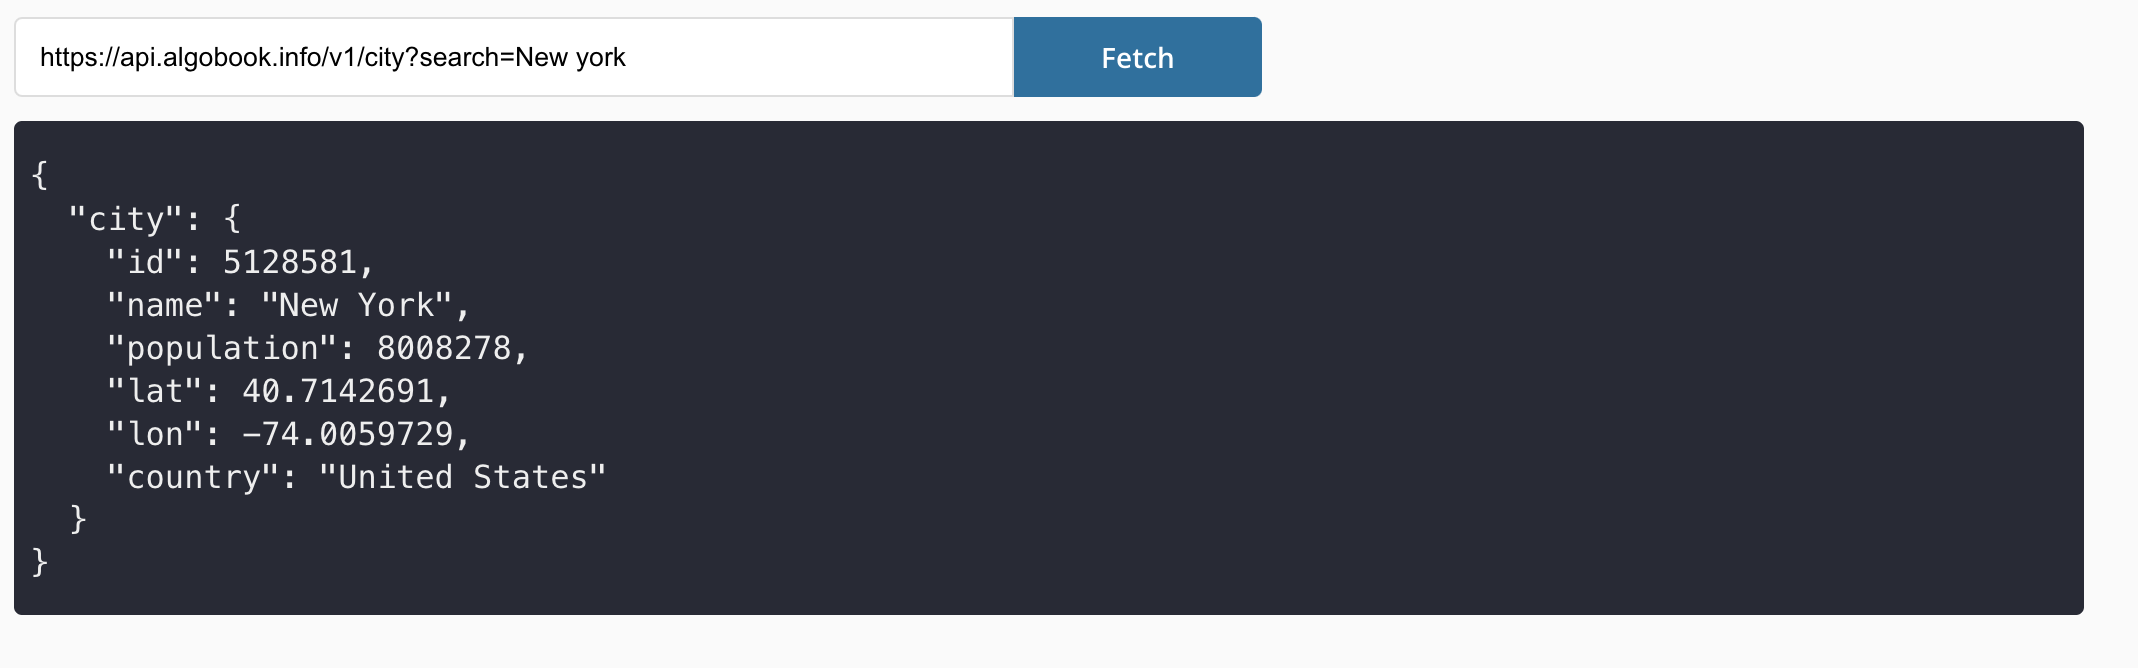
Final result
Example image of how the component will look when we are done.
Create our component
Let's start with creating our APITester.tsx. I will share the code below, and then I will explain the important parts afterwards.
NOTE that I am using our loading button in this example. You can download it from npm.
npm i reactjs-loading-button
If you don't want to use it, a regular button will do just fine.
React component
import { LoadingButton } from "reactjs-loading-button";
import { useState } from "react";
import styles from "./APITester.module.scss";

interface IAPITesterProps {
  url: string;
}

export const APITester = (props: IAPITesterProps) => {
  const [url, setUrl] = useState(props.url);
  const [loading, setLoading] = useState(false);
  const [response, setResponse] = useState<any>(null);

  const fetchData = async () => {
    try {
      setLoading(true);
      const raw = await fetch(url);
      const json = await raw.json();
      setResponse(JSON.stringify(json as any, null, 2));
    } catch (err) {
      setResponse(null);
    } finally {
      setLoading(false);
    }
  };

  const renderResponse = () => {
    if (!response) {
      return null;
    }
    return (
      <div className={styles.responseContainer}>
        <code className={styles.code}>{response}</code>
      </div>
    );
  };

  return (
    <div className={styles.apiTester}>
      <div className={styles.inputContainer}>
        <input
          className={styles.input}
          placeholder={url}
          onChange={(e) => setUrl(e.target.value)}
          value={url}
        />
        <LoadingButton
          text="Fetch"
          isLoading={loading}
          onClick={fetchData}
          loadingMode="SPINNER"
          buttonStyle={{
            color: "white",
            backgroundColor: "#0072a1",
            fontWeight: "bold",
            borderRadius: "0 4px 4px 0",
          }}
        />
      </div>
      {renderResponse()}
    </div>
  );
};
That's all for our component. Let's see what is going on here.
-
First we are initializing our states, our default URL will be the one that is passed in from the props.
-
fetchData() will fetch the data and set the response state to the JSON. We will also toggle the isLoading state. We are also formatting the JSON here to look a little bit prettier. We have a guide on how to format JSON, read it here.
-
renderResponse() will basically render our response if there is any
Style our component
Let's create our APITester.module.scss file.
.apiTester {
  display: flex;
  flex-direction: column;

  .inputContainer {
    display: flex;

    .input {
      height: 40px;
      border-radius: 4px 0 0 4px;
      width: 100%;
      max-width: 500px;
      box-sizing: border-box;
      border: 1px solid #ddd;
      background-color: white;
      padding: 12px 20px 12px 12px;
      color: black;
    }
  }

  .responseContainer {
    margin-top: 12px;
    background: #282a36;
    border-radius: 4px;
    padding: 16px 8px;
    .code {
      color: #eee;
      white-space: pre;
    }
  }
}
There we go. The most important part about the styling, is the white-space: pre; which will make the code formatting look good since it will break at new lines basically.
Consume it
To use our component, we should consume it like this
import { APITester } from "./APITester";

<APITester url={API_URL} />;
External libs
If you want the code part to look better, there are great libs for this. I would recommend react-markdown and react-syntax-highlighter which will render the JSON with some nice looking colors.
Download
npm i react-markdown react-syntax-highlighter
Import
Import the libs like this in the component
import ReactMarkdown from "react-markdown";
import { Prism as SyntaxHighlighter } from "react-syntax-highlighter";
import { dracula } from "react-syntax-highlighter/dist/esm/styles/prism";
Use it like this
In our renderResponse, we change it like this.
 const renderResponse = () => {
    if (!response) {
      return null;
    }

    const mdContent = `\`\`\`json\n ${response} \n\`\`\``;
    return (
      <ReactMarkdown
        children={mdContent}
        components={{
          code({ node, inline, className, children, ...props }) {
            const match = /language-(\w+)/.exec(className || "");
            return !inline && match ? (
              <SyntaxHighlighter
                children={String(children).replace(/\n$/, "")}
                style={dracula as any}
                language={match[1]}
                PreTag="div"
                {...props}
              />
            ) : (
              <code className={className} {...props}>
                {children}
              </code>
            );
          },
        }}
      />
    );
  };
Declare the types (optional)
If you are using TypeScript, you need to set the types yourself. In your modules.d.ts file:
declare module "react-syntax-highlighter";
declare module "react-syntax-highlighter/dist/esm/styles/prism";
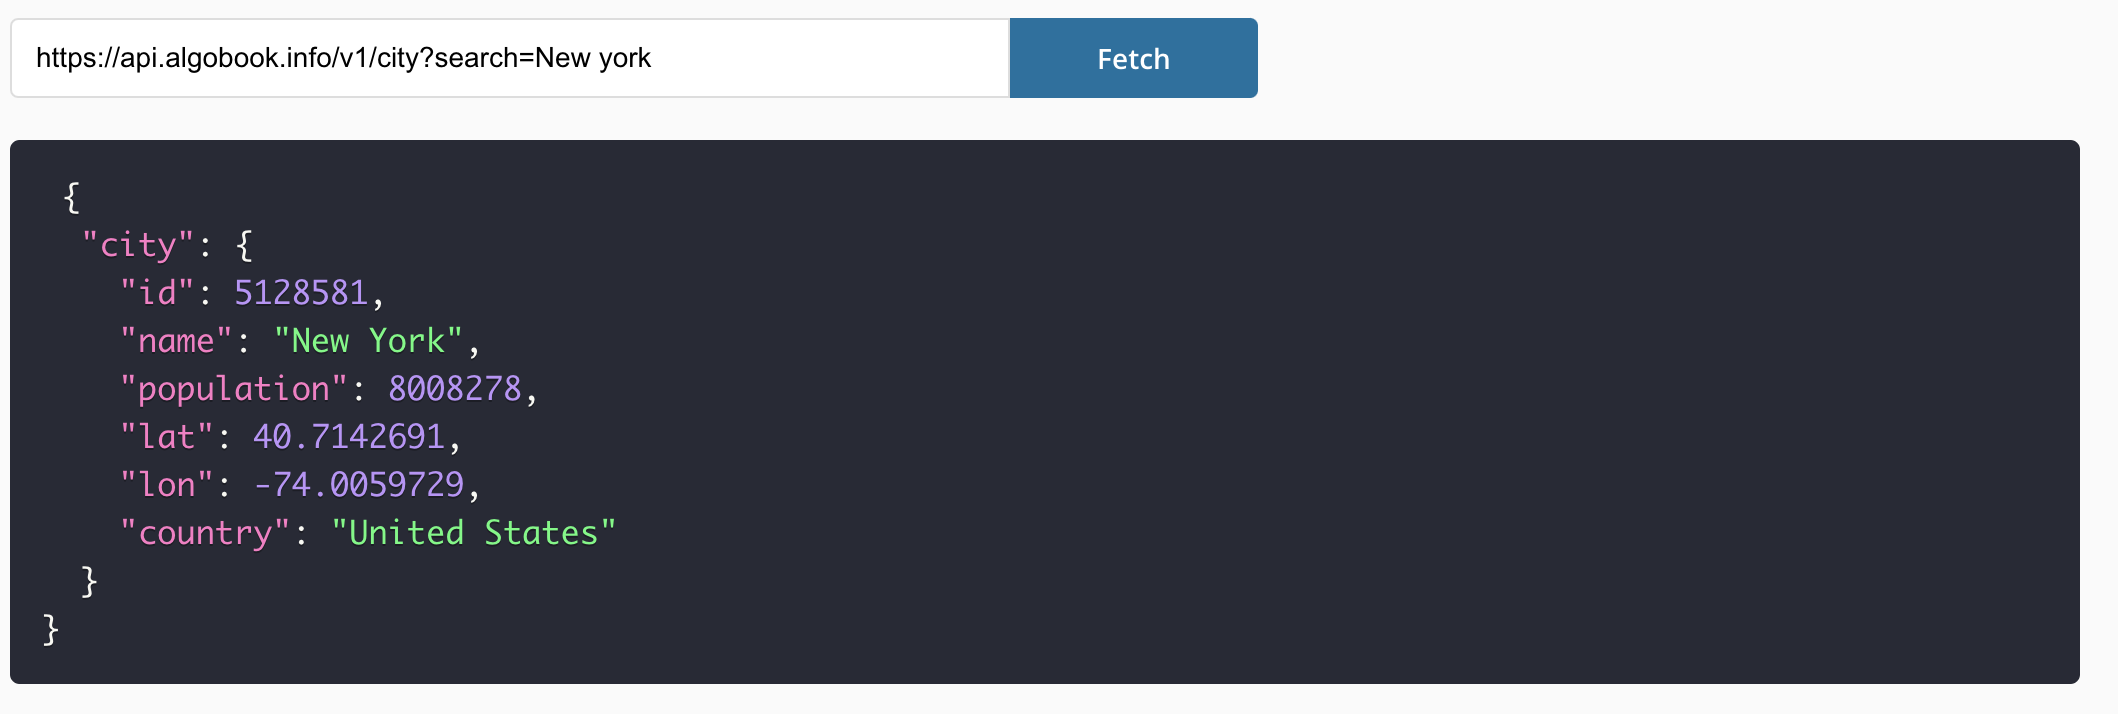
Result
And the result will look like something like this instead
Outro
That's it for this tutorial. I hope you found this interesting and that it helped you with building your API preview component.
Thanks for reading, and have a great day!
 Tue May 16 2023
 Webcam component in React for taking photos that can be downloaded or sent to an APIA tutorial on how we can create a component that accesses the webcam and take photos. We will make the image downloadable and prepare it to be added to form data to POST it to an API.
 Update state in React for objects and arraysA guide on how to work with objects and arrays in React states. We will remove, add and update enitities in the state and explain the cause of mutation in React states.
 Implement an add to cart feature in ReactA tutorial on how to implement an add to cart feature for a webshop, using React, context API and JavaScript
 Create a QR code generator in ReactA tutorial on how to build a QR code generator in React using a free API from Algobook.
 Tabs component in React with icon supportIn this tutorial we will create a Tabs component that we can use in our application for showing different type of content.
 Build a full stack application with React and NodeJsA tutorial on how to build a simple full stack application with React in the client side and NodeJs in the backend.
 How to make pages in React scroll to top automaticallyA short tutorial on how we can make our pages always scroll to the top once navigated to. We will create a custom hook that we can implement in our pages.
 Create a contact us form in React with email integration using a free APIA tutorial on how we can create a contact us form with just using React with a 100% free Email API integration.
 Create a responsive sidebar menu in React with a visibility toggleA tutorial on how to create a responsive sidebar in React with icons, links, visibility toggle and a slide in animation. We will also share example how to get it to work with react router dom using NavLinks.
 A react component for displaying Adsense adsA guide on how we can create a component in react for displaying ads from Adsense
 How to achieve a typing animation on a textA short tutorial on how to achieve a typing animation effect on a text, using css and React.