
Create a contact us form in React with e-mail functionality
In this tutorial, we will explore how we can create a contact us form in React and make our users send e-mails to us through the form without any backend implementation.
To make this possible, we will utilize our free E-mail API.
Promotion
If you have read my articles before, you might have seen my promotion articles before where we highlight some of our free software that we offer to the world. This article is no different, today, we will show how we can use our E-mail API. If you don't want to implement your contact us form yourself, check out our email widget that is already implemented and ready to use.
NOTE that you need to contact us if you want to use this API. Read more in the documentation page.
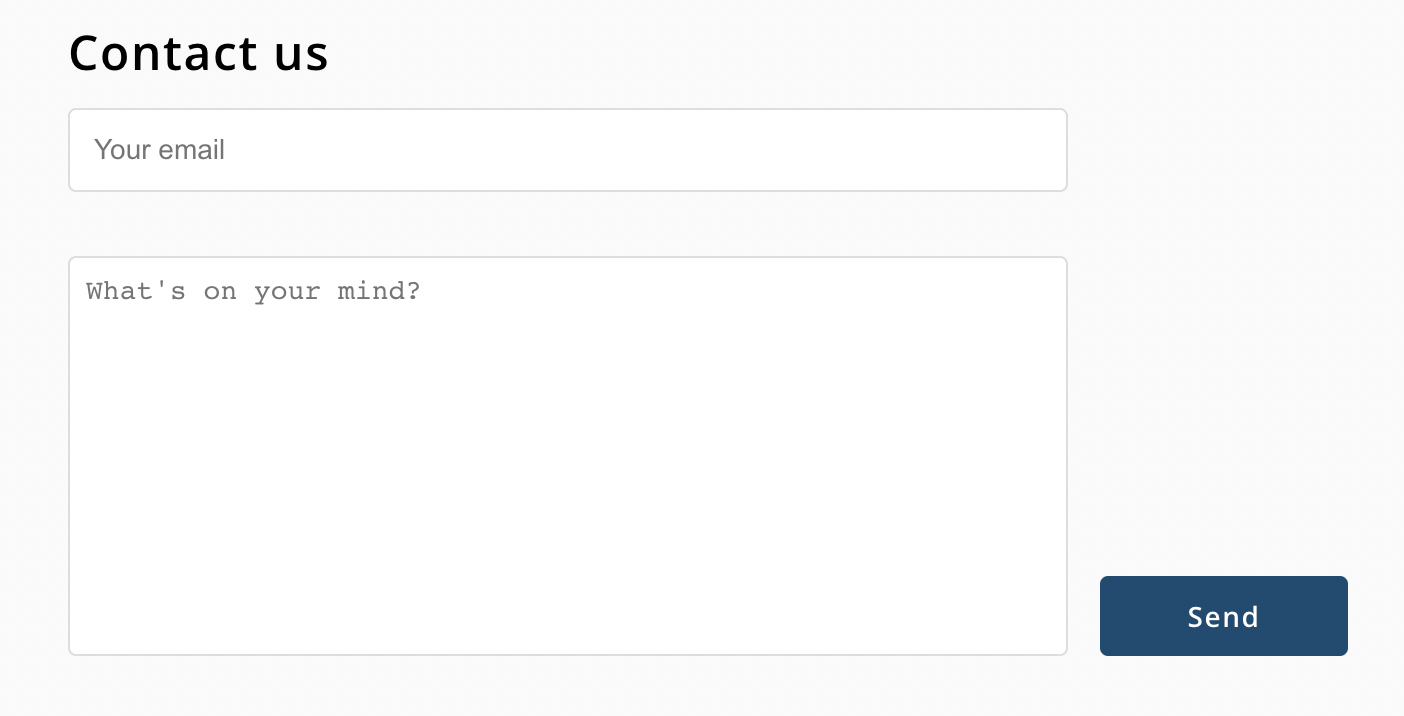
Final result
When we are done, it will look like this
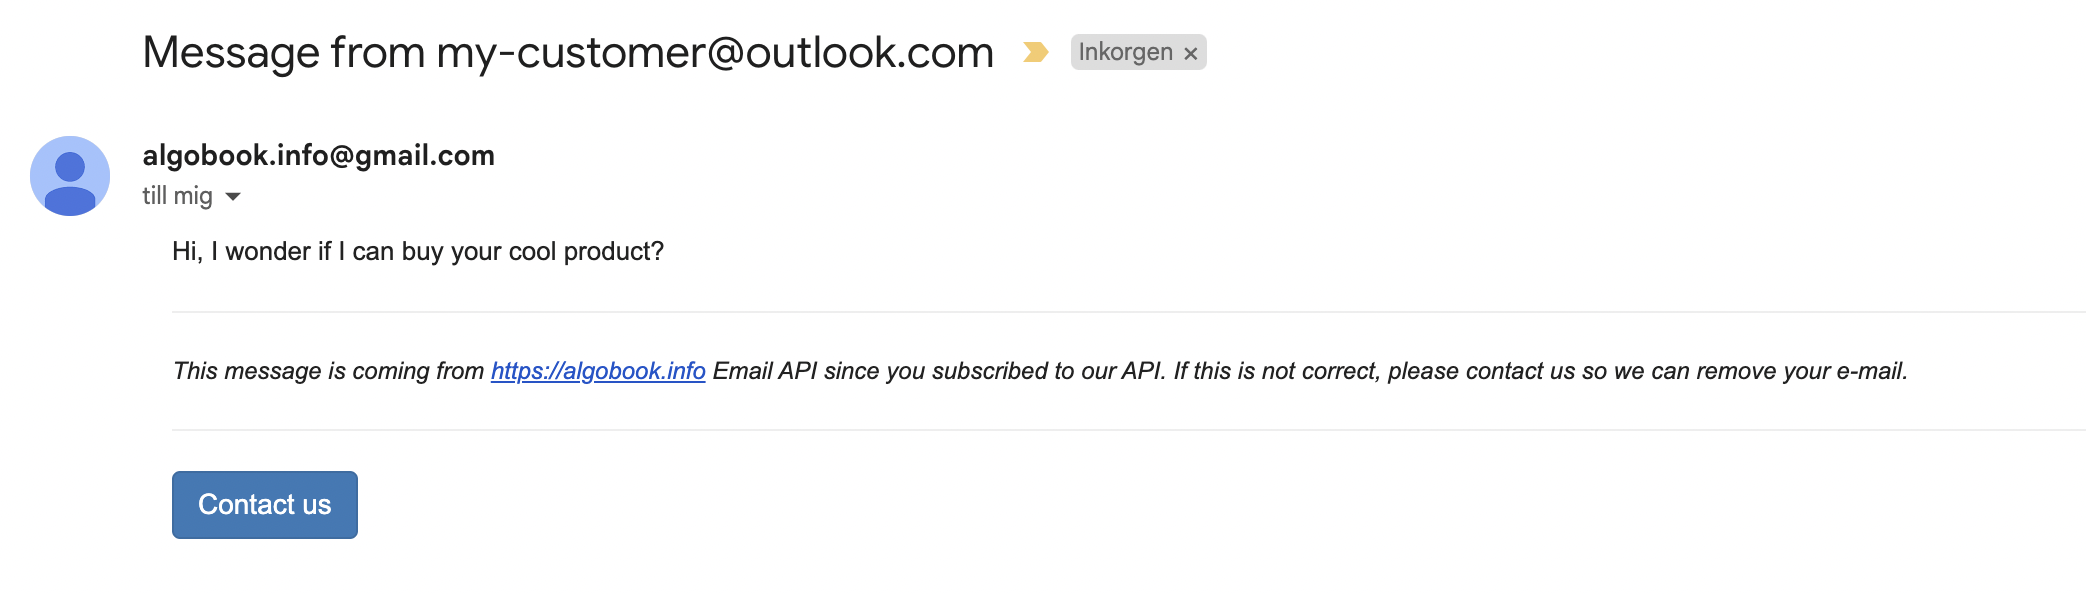
An our email will look something like this
Dependencies
We will use our open source reactjs-loading-button in this tutorial, if you want to use a regular button, it will work just as fine (almost). And we will use axios as well to do our request.
npm i axios reactjs-loading-button
Create our component
Let's start by creating our component. Create a file called SendMail.tsx.
We will start with importing our dependencies and styling, and creating our component with our states.
import { LoadingButton } from "reactjs-loading-button";
import { useState, useCallback } from "react";
import styles from "./SendMail.module.scss";
import axios from "axios";

export const SendMail = () => {
  const [email, setEmail] = useState("");
  const [message, setMessage] = useState("");
  const [error, setError] = useState("");
  const [success, setSuccess] = useState(false);
  const [isLoading, setLoading] = useState(false);

  return ();
}
Now, let's create our DOM structure.
- We will have an input for the email of the "customer".
- We will have a textarea for the message that we will send
- We will setup some status messages at the bottom that we will show depending on how the request went
return (
  <div className={styles.mail}>
    <h2>Contact us</h2>
    <div className={styles.wrapper}>
      <div className={styles.areaContainer}>
        <input
          value={email}
          type="email"
          className={styles.input}
          onChange={(ev: any) => setEmail(ev.target.value)}
          placeholder="Email"
        />
        <textarea
          value={message}
          className={styles.area}
          onChange={(ev) => setMessage(ev.target.value)}
          placeholder="What's on your mind?"
        />
      </div>
      <LoadingButton
        isLoading={isLoading}
        loadingMode="SPINNER"
        text="Send"
        onClick={() => sendMail()}
        buttonStyle={{
          backgroundColor: "#104b72",
          fontWeight: "bold",
        }}
      />
    </div>
    {success ? (
      <span className={styles.success}>Thanks for contacting us!</span>
    ) : error ? (
      <span className={styles.error}>{error}</span>
    ) : null}
  </div>
);
Nexr, we will create our functions to handle the logic. We will start with validateEmail() function that we will use to check if it is a valid email that the user is giving us.
const validateEmail = useCallback((email: string) => {
  return String(email)
    .toLowerCase()
    .match(
      /^(([^<>()[\]\\.,;:\s@"]+(\.[^<>()[\]\\.,;:\s@"]+)*)|.(".+"))@((\[[0-9]{1,3}\.[0-9]{1,3}\.[0-9]{1,3}\.[0-9]{1,3}\])|(([a-zA-Z\-0-9]+\.)+[a-zA-Z]{2,}))$/
    );
}, []);
And now we will create our sendMail() function that will check that everything is filled in correctly, and then fire the request.
const sendMail = async () => {
  setError("");
  setSuccess(false);
  if (!email) {
    setError("Please enter your email");
    return;
  } else if (!validateEmail(email)) {
    setError("Wrong format of email");
    return;
  } else if (!message) {
    setError("You must write something...");
    return;
  }
  setLoading(true);
  try {
    const response = await axios.post("https://api.algobook.info/v1/mail/send", {
      recipient: `your-trusted-mail@gmail.com`
      subject: `Message from ${email}`,
      text: message,
    });
    if (response.data.error) {
      setError(response.data.error)
    } else if (response.data.status === "SUCCESS") {
      setEmail("");
      setMessage("");
      setSuccess(true);
    }
  } catch (err) {
     setError(err)
  } finally {
    setLoading(false);
  }
};
Notes about the code
- We are clearing our error and success states to begin with
- We are doing some checks that the user has inputed a valid email and a message in the form
- If validation is passed, we are setting our loading state to true
- We fire the email and if it returns an error, we display it at the bottom
- If everything goes well, we clear the form and show a success message
- And finally, clearing our loading state
Full code
Below is the final code of the component
import { LoadingButton } from "reactjs-loading-button";
import { useState, useCallback } from "react";
import styles from "./SendMail.module.scss";
import axios from "axios";

export const SendMail = () => {
  const [email, setEmail] = useState("");
  const [message, setMessage] = useState("");
  const [error, setError] = useState("");
  const [success, setSuccess] = useState(false);
  const [isLoading, setLoading] = useState(false);

  const validateEmail = useCallback((email: string) => {
    return String(email)
      .toLowerCase()
      .match(
        /^(([^<>()[\]\\.,;:\s@"]+(\.[^<>()[\]\\.,;:\s@"]+)*)|.(".+"))@((\[[0-9]{1,3}\.[0-9]{1,3}\.[0-9]{1,3}\.[0-9]{1,3}\])|(([a-zA-Z\-0-9]+\.)+[a-zA-Z]{2,}))$/
      );
  }, []);

  const sendMail = async () => {
    setError("");
    setSuccess(false);
    if (!email) {
      setError("Please enter your email");
      return;
    } else if (!validateEmail(email)) {
      setError("Wrong format of email");
      return;
    } else if (!message) {
      setError("You must write something...");
      return;
    }
    setLoading(true);
    try {
        const response = await axios.post("https://api.algobook.info/v1/mail/send", {
          recipient: `your-trusted-mail@gmail.com` // Your whitelitsted email
          subject: `Message from ${email}`,
          text: message,
        });
        if (response.data.error) {
          setError(response.data.error)
        } else if (response.data.status === "SUCCESS") {
          setEmail("");
          setMessage("");
          setSuccess(true);
        }
      } catch (err) {
        setError(err)
      } finally {
        setLoading(false);
      }
  };

  return (
    <div className={styles.mail}>
      <h2>Contact us</h2>
      <div className={styles.wrapper}>
        <div className={styles.areaContainer}>
          <input
            value={email}
            type="email"
            className={styles.input}
            onChange={(ev: any) => setEmail(ev.target.value)}
            placeholder="Your email"
          />
          <textarea
            value={message}
            className={styles.area}
            onChange={(ev) => setMessage(ev.target.value)}
            placeholder="What's on your mind?"
          />
        </div>
        <LoadingButton
          isLoading={isLoading}
          loadingMode="SPINNER"
          text="Send"
          onClick={() => sendMail()}
          buttonStyle={{
            backgroundColor: "#104b72",
            fontWeight: "bold",
          }}
        />
      </div>
      {success ? (
        <span className={styles.success}>Thanks for contacting us!</span>
      ) : error ? (
        <span className={styles.error}>{error}</span>
      ) : null}
    </div>
  );
};
Style our component
Now, let's style our component. Create a file called SendMail.module.scss. If you don't have sass set up, check this guide. CSS will work fine as well though.
@mixin statusText() {
  font-size: 12px;
  font-style: italic;
  padding: 0.5rem 0;
}

.mail {
  display: flex;
  flex-direction: column;
  width: auto;

  .success {
    @include statusText();
    color: #249b24;
  }

  .error {
    @include statusText();
    color: #af3a3a;
  }

  h2 {
    margin-bottom: 0.75rem;
  }

  .wrapper {
    display: flex;
    gap: 1rem;
    align-items: flex-end;
    flex-wrap: wrap;
  }

  .areaContainer {
    display: flex;
    flex-direction: column;
    align-items: flex-end;

    .input {
      width: 500px;
      padding: 0.5rem;
      border-radius: 4px;
      box-sizing: border-box;
      border: 1px solid #ddd;
      font-size: 14px;
      background-color: white;
      padding: 12px 20px 12px 12px;

      @media only screen and (max-width: 800px) {
        width: 270px;
      }
    }

    .area {
      margin-top: 2rem;
      width: 500px;
      height: 200px;
      padding: 0.5rem;
      resize: none;
      border-radius: 4px;

      box-sizing: border-box;
      border: 1px solid #ddd;
      font-size: 14px;
      background-color: white;
      color: black;

      @media only screen and (max-width: 800px) {
        width: 270px;
      }
    }
  }
}
There we go. And now we have a fully functional contact us form in plain React that enables your users and customers to send messages to you, and you don't have to pay for any expensive email service or spend time implementing it yourself.
Outro
In this article, we explored our free email API that we offer. We created a simple contact us form that we could use to make our users send emails to our "trusted email" that you should contact us to get whitelisted in the API before using it.
I hope you found this article interesting and helpful. If you want to check out more cool and free software and APIs, head over to our software page.
Have a great day!
 Tue May 23 2023
 Webcam component in React for taking photos that can be downloaded or sent to an APIA tutorial on how we can create a component that accesses the webcam and take photos. We will make the image downloadable and prepare it to be added to form data to POST it to an API.
 Update state in React for objects and arraysA guide on how to work with objects and arrays in React states. We will remove, add and update enitities in the state and explain the cause of mutation in React states.
 Implement an add to cart feature in ReactA tutorial on how to implement an add to cart feature for a webshop, using React, context API and JavaScript
 Create a QR code generator in ReactA tutorial on how to build a QR code generator in React using a free API from Algobook.
 Tabs component in React with icon supportIn this tutorial we will create a Tabs component that we can use in our application for showing different type of content.
 Build a full stack application with React and NodeJsA tutorial on how to build a simple full stack application with React in the client side and NodeJs in the backend.
 How to make pages in React scroll to top automaticallyA short tutorial on how we can make our pages always scroll to the top once navigated to. We will create a custom hook that we can implement in our pages.
 Create a responsive sidebar menu in React with a visibility toggleA tutorial on how to create a responsive sidebar in React with icons, links, visibility toggle and a slide in animation. We will also share example how to get it to work with react router dom using NavLinks.
 A react component for displaying Adsense adsA guide on how we can create a component in react for displaying ads from Adsense
 How to achieve a typing animation on a textA short tutorial on how to achieve a typing animation effect on a text, using css and React.